
In food photography we use lots of tricks to make our life easier and also amazing photos. As a food blogger you need to show your food as good as you can. Sometimes all falls apart: the dressing doesn’t stay long on the salad, pasta is sticking together, the dessert looks like you just throw it on the plate, etc.
Our traditional Romanian “Ciorba de perisoare” (Sour soup with meatballs) was difficult for me to shoot until I found a trick to keep my meatballs on top. I used the lids from cough syrup. They are made from plastic and you can find them in different shapes. So keep them for your future projects.
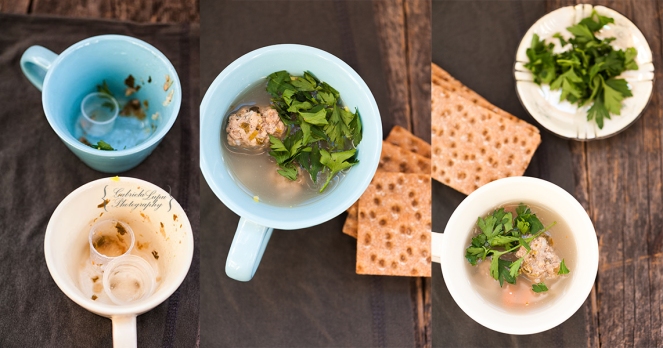
As you can see in the final shots you can’t even tell I have them in the soup.
Another trick is to pick the fresh vegetables you can find. They look better on the camera.
Take the photos of the meats and vegetables before being fully cooked. They will look plump and juice. Remove them from the stove a bit early, take your photos and then finish cooking them.
To make the vegetables look fresh in a salad brush them with olive oil or mist with water.
To keep everything together you can use a toothpick. You can hide it in the back of the food.
For looping noodles or rearranging small crumbs you can use tweezers. Keep one in the kitchen just for this.
With a little patience and experience you will develop skills to make your food photography look good.
There are also tricks for food photography, but you can’t eat the food after. At the big shootings there is a golden rule. Don’t eat the food you shoot, because you don’t know what it is.
They use motor oil for syrup, glycerin to look fresh, cotton balls for illusion of steaming-hot foods, spray deodorant for frosty look, white glue instead of milk, shaving cream for cream, mashed potatoes with powdered sugar for ice cream and fake champagne made of water, soy sauce and Alka Seltzer for the bubbles.

Great ideas! Any tips for pasta? I took ages to get a shot I was semi-pleased with. I used tongs to twist it around so it wasn’t all over the place
Make it “al dente” shoot it and then finish it.
Thanks. I did overcook it a touch so that will help 🙂
You are welcome
Also loving the clarity tip from a few tips ago. I hadn’t even thought of using it within CameraRAW until you mentioned it. Thanks! 🙂
You are welcome
I had no idea how many fake tricks they use during the big photoshoots, the food in the glossy magazines always looks so enticing, who knew!
These are just a few
Blergh!
Love this article, will definitely try out these tips! Thanks xx
You are welcome
Very interesting. Thanks for sharing.
You are welcome
Great ideas! Some dishes are really difficult to shoot, such as stews, some soups or lasagne. I always appreciate advise how to make those dishes as pretty as possible 🙂 also, the amount of fake tricks really is shocking, will look at foodie magazines from a different angle now 😉
Thank you
Thanks!
You are welcome
This is great, I don’t think i’ll look at another food magazine the same again! Great tips and great blog. Thank you
Thank you
I’ll never look at the food pictures in major publications the same way again…
Sorry to spoil it for you
No, it’s quite fascinating actually!
Interesting tricks!!
I’m a novice at food pictures for my blog. One thing I learned from you earlier was to use natural light. That has helped a lot. Thanks for these new tips!
You are welcome
Some really helpful tips here. Personally I can’t bear to waste good food so I like to eat what I’ve cooked for a photo. Sometimes I even take Glyn’s meal off him to photograph it before he can eat it (he is very patient) and will have to re-heat it but I feel better doing that then throwing it in the bin. Happy cooking!
I am doing the same. I am re-heating the food.
Good styling tips thanks for sharing!
You are welcome
hey, thanks for these tips! I know nothing about photography but with these tips I think, i am going to improve!
You are welcome
Great post! How would you go about in shooting loose dessert dishes? (the ones that once cut fall apart) 🙂
I will try another batch.
Wow great idea! Thanks for sharing!
You are welcome
Great tips here, thank you. Have you been instructing Marks and Spencer?😜
Not yet 🙂
This person usually makes food appealing to look at. She makes desserts. She put a video on the internet. https://youtu.be/-oZkxO4V-Sw I had to take pictures of things to put on an online store. Lighting was my problem. The key words for my experience are modern art and display. This is what a display looks like. https://plus.google.com/collection/EPr2c
I tried to post something and it did not appear. Here is a second attempt. These links lead to information about people that I have encountered that usually make food very appealing. https://plus.google.com/collection/EPr2c,
https://plus.google.com/s/%23bread/top, (google+ #bread)
https://youtu.be/-oZkxO4V-Sw (How I EDIT and FILM my videos | Mon Amie)
I took pictures for an online store. I had problems with lighting. The key words from my experience for taking pictures of food are: display, prop styling, modern art. If you are interested in the publishing industry search for: media bistro at YouTube and at a search engine.
I don’t know why it did not appear. This is the only comment I saw from you.
Great tips. Essential for anyone who wants to learn a little more food photography, like me! Thanks for sharing.
You are welcome
Love the trick with the bottle caps in the soup, that’s really helpful!
Thanks for the tips, these are great! 🙂
You are welcome
This is a really interesting post, includes great tips too!X
Happy you like it.
Very useful tips!
Happy you like it.
Your photos ARE always AMAZING!!!! Thanks for the tips. The one I might actually employ is the “Take the photos of the meats and vegetables before being fully cooked. . . Remove them from the stove a bit early, take your photos and then finish cooking them.” Because I am NOT a food blogger I don’t always think that I am going to post about what I am cooking so half the time I don’t even think to take a picture until I am done. And when I am cooking I am cooking because I am hungry so I don’t want to futz around with my food taking pictures. I want to eat it! 🙂 If I remember . . . I will use the “before fully cooked” trick because I like hot food and taking pictures of it just allows it to get cold. Thank you!
Thank you. You are welcome.
I like cake and often share pics of them on my Fb page so I’ve shared your blog post on there – no shaving foam in my cakes…but then that’s probably why my photos are pretty rubbish lol
Thanks for the sharing
Really interesting about the pro tricks. Better than Phtoshop! You posts are always helpful and interesting.
Thank you
Thanks for the tips, I’m really trying to learn how to take good photos of food. It would be awesome if you had a look at some recipes on my site and sent some feedback on how I could improve them. It’s so difficult and I’m brand new to it haha 😊
It was also really interesting about the reality of progressional food photography
You are welcome
Great post and wow I’m shocked at those insights from professional shoots! Who would’ve known!
Thank you
Interesting tricks!!
Thank you
Thanks for the tips. Your earlier tip of shooting in natural light helped me a lot. Now I try to cook during the day as far as possible so that I can take pics in natural light.
Was shocked to know the tricks used by glossy magazines for those wonderful pictures. And I used to drool over the food they were showing, which actually may not even be edible 😠
You are welcome
Thanks for sharing!
You are welcome
Where has this been for all the time?! Great tips for starting, especially the one with the cough syrup lid! Thank you for sharing!
You are welcome
Thanks a lot. This a very interesting and useful info. 🙂
You are welcome
Thanks for these tips. Interestingly I wrote an article on my blog about an award winning Jamaican photographer who told me that he wasn’t into food photography.
You are welcome
Thanks for the tips!
You are welcome
Some great ideas – thank you! I always knew there had to be plenty of trickery involved in professional food photography. A really interesting post.
Thank you
Thank you. Some of the photos I took last night made the pot roast I was writing about look so bad that I refused to post them on my blog. The next time I photograph food, I’ll know what to do.
You are welcome
Some great tips here. Those cough medicine cups are a genius idea! Thank you for sharing.
You are welcome
The main problem is that I always want to eat the food I cook 😀 and I don’t like when it gets cold, so I usually spend one minute or so for the photos 😀
You can leave aside for the photo. That is what I do sometimes.
Great post, thanks for the tips!
You are welcome
Excellent tips
Thank you
Great tips Gabi, thank you so much. I figured those fancy magazine did some gyrations to make the food look better but I had no idea these use all that non edible stuff, yuck! – Kat
You are welcome
wow! thanks for the tips, this is definitely something I want to improve upon as I continue with my blogging and photography
You are welcome
No wonder the food never looks the same when ordering! Enjoying your blog!
I am happy
Great tips
Thank you