
White balance is a way to “measure” the temperature of light. The goal of a conventional photograph is to attain an ideal White Balance where the white color is as close to true, neutral white as possible and all of the colors in your image are in real life. The white balance that you shoot on is determined by the color temperature of your light source. Depending on your result, you can have a yellowish photo to give a warm feeling or a blueish one to give a cold feeling. You are the one to decide about that. That doesn’t mean that your photo will be yellow. It means that your white is a little bit yellowish.
Cameras capture color based on what type of light is being used to light the scene. Every light source has a different color temperature output. This temperature then affects how the colors in the scene will look in our exposures and what the correct white balance setting should be.
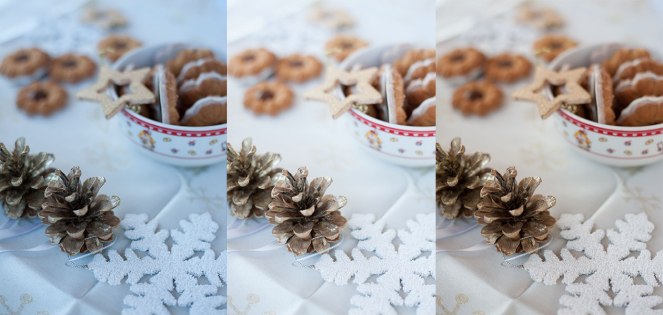
You can get great neutral looking pictures with each source, but you can’t shoot them on the same white balance setting.
Most digital cameras have functions for Auto White Balance, a group of preset White Balance (sunny, cloudy, shade, flash, fluorescent, etc…), and a Custom Preset that you can set yourself. You can leave the camera to work out the White Balance automatically, but not all the time will work correct. If you don’t know how to adjust it, check the manual.
The two most common light sources you will run into are Daylight and Tungsten light.
Light when it is high noon and clear outside is around 5,000-5,500 degrees K. Your flashes are calibrated to try and be at this temperature.
Tungsten lighting is around 3,200 degress K. This is the lighting you see frequently in your home or restaurants, it has an orange looking glow to it.
With every light source having its own color temperature, make sure that you are on the correct mode when shooting. If you are outside then it is going to be Daylight, Overcast, or Shade setting. If inside under a tungsten lamp, it will be tungsten setting. If inside with flash it will be daylight. Play around with the different modes to find what works best for your situation! When you change lighting environments don’t forget to change you White Balance mode!

Love to read your posts always so interesting and useful. Thanks!
Thank you
Very nice, concise discussion of white balance and how to manage it.
Thank you
I will be taking this with me into my black and white photography class next semester… thanks ; )
You are welcome
; )
: )
Just treated myself to an early Christmas present of a beginner’s DSLR camera, no more iphone. Your blog article is going to be helpful! So much to learn! Thank you!
You are welcome. I wish you great light and great photos.
Thanks for putting this together and sharing.
You are welcome
Thanks for the tip. Really helpful. Pics are already looking better
I am happy to hear that
I have a lot to learn and love these tips. Thank you.
You are welcome
I am happy. Good work!
You are welcome
Such an informative post on photography. Thank you for sharing!
You are welcome.
Thanks for the tips! I’m starting to learn more about food photography for my blog and just bought a Lowel Ego Digital Imaging Fluorescent Light to help with indoor lighting. Do you use any special lights for your photography?
Most of the time I use natural light, but I have a small studio with 3 lights.Nothing special. In the budget.
Natural light is definitely better! Just not feasible all the time. Love all your photos!
Always useful information! Thanks so much. Beautiful photographs
Thank you
Reblogged this on Cappuccino.
This is very helpful!
Thank you
Thanks for that! really needed it! I totally need to improve my food photos!
You are welcome
Thank you, I’ve only had my camera for a few months and haven’t taken it off the Auto setting yet. When I find time I am going to look into this!
Happy to help
I’ve been reading through your food photography tips – they’re very helpful and easy to understand for a beginner like me! Thanks for sharing them 🙂
You are welcome